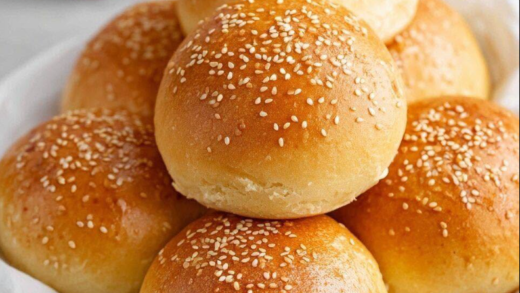
As a chef who bakes for both comfort and flavor, I can say this homemade honey buttermilk bread is one of my most cherished recipes. It’s everything you want from a loaf fluffy interior, golden crust, a touch of natural sweetness, and that dreamy aroma that fills your kitchen. Whether I’m serving it warm with butter, building sandwiches, or toasting it for breakfast, this bread always delivers.

Why You’ll Love This Honey Buttermilk Bread
What makes this bread a go to favorite? It’s not just about the flavor. The buttermilk adds a tender crumb, the honey gives a mellow sweetness, and the slow rise brings a smooth texture you’ll want to sink your teeth into. It’s the kind of loaf that looks bakery perfect but feels made from the heart.
- Super soft crumb: The buttermilk and honey work together to give the bread a tender, fluffy interior.
- Lightly sweetened: Natural honey brings subtle flavor without overpowering the loaf.
- Golden crust: Brushed with butter for that perfect golden finish and soft chew.
- Simple ingredients: No preservatives, just real pantry staples you already love.
- Versatile: Toast it, slice it for sandwiches, serve it warm with butter, or freeze for later.
Step by Step Guide to Baking Honey Buttermilk Bread
This bread doesn’t require a bread machine or fancy mixer just your hands and a little patience. Here’s how I make it in my own kitchen.
Ingredients
- 1 cup warm buttermilk
- ¼ cup warm water
- 2¼ teaspoons active dry yeast
- ¼ cup honey
- 2 tablespoons melted butter
- 1 teaspoon salt
- 3½ cups all purpose flour
Instructions
1: Activate the Yeast
- In a small bowl, combine the warm buttermilk, warm water, and yeast.
- Let it sit for about 5 minutes until it becomes foamy on top this means the yeast is alive and ready.
2: Mix Wet Ingredients
- Add the honey, melted butter, and salt into the yeast mixture.
- Stir until the ingredients are fully blended and smooth.
3: Add the Flour
- Gradually add in the flour, one cup at a time, stirring with a wooden spoon or using your hands until a shaggy dough forms.
4: Knead the Dough
- Turn the dough onto a floured surface and knead it for 8 to 10 minutes until it becomes smooth and elastic.
- Chef’s tip: The dough should bounce back when poked and feel slightly tacky but not sticky.
5: First Rise
- Place the dough into a greased bowl, cover with a damp towel or plastic wrap, and let it rise in a warm area for about 1 hour, or until doubled in size.
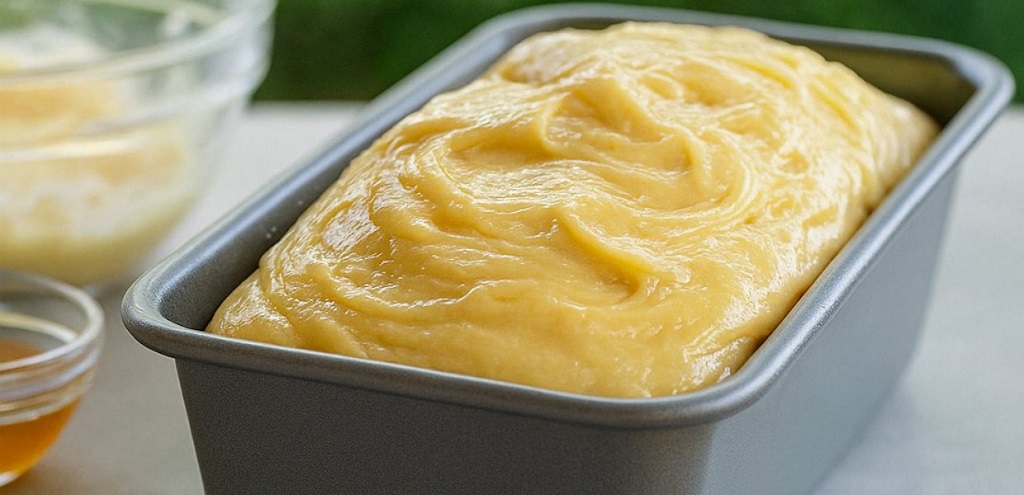
6: Shape and Second Rise
- Punch down the dough to remove air, then shape it into a loaf.
- Place it into a greased loaf pan, cover again, and let it rise for another 30 minutes.
7: Bake to Perfection
- Preheat your oven to 350°F (175°C).
- Bake the bread for 30 to 35 minutes, or until the top is golden brown and it sounds hollow when tapped on the bottom.
8: Cool and Serve
- Remove from the pan and place on a wire rack to cool completely before slicing.
- Optional: Brush the top with extra melted butter for added softness and sheen.
Best Ways to Enjoy Honey Buttermilk Bread
Simple Serving Ideas
Whether fresh out of the oven or toasted the next morning, this loaf always has something delicious to offer. Here are a few of my favorite ways to enjoy it:
- Classic toast: With butter and a light drizzle of honey or jam.
- French toast: Soaks beautifully into egg mixture without falling apart.
- Sandwiches: Use it for ham, turkey, or veggie sandwiches the slight sweetness complements savory fillings.
- Grilled cheese: Melts perfectly and gives a golden crust.
- Breakfast side: Serve with scrambled eggs, avocado, or a poached egg on top.
Storage Tips for Freshness
Because this bread is made without preservatives, proper storage helps it stay soft longer:
- Room temperature: Store in an airtight container or bread box for up to 3 days.
- Refrigerate: For up to 5 days, especially in humid climates (wrap in parchment first).
- Freeze: Slice first, then wrap slices in parchment and store in a zip top bag. Toast or reheat when needed.
Customizations and Flavor Variations
Creative Ways to Elevate Your Buttermilk Bread
One of the reasons I love this honey buttermilk bread is how easy it is to customize. A few small tweaks and you can transform the flavor, texture, or visual appeal without needing to overhaul the base recipe.
- Whole wheat variation: Swap out 1 to 1½ cups of the all purpose flour for whole wheat flour. The result is slightly denser with a nutty undertone.
- Honey oat loaf: Before baking, brush the top with milk and sprinkle with rolled oats for a rustic look and texture.
- Herb and garlic version: Add 1 teaspoon of dried rosemary or thyme and a pinch of garlic powder to the dough for a savory twist.
- Cheese swirl: Roll out the dough before the second rise, sprinkle with shredded cheddar, and roll it back into a loaf shape before placing in the pan.
- Nutty crunch: Add ¼ cup of chopped walnuts or pecans to the dough for texture and earthy flavor.
Storage, Freezing, and Meal Prep Magic
How to Store Honey Buttermilk Bread the Right Way
One of the best parts of this honey buttermilk bread is how well it keeps when stored properly. From day one freshness to week long planning, here’s exactly how I keep my loaf soft and ready for whatever the day brings.
- Room temperature: Wrap your cooled loaf in a clean kitchen towel or parchment and place in an airtight bread box. It stays fresh for up to 3 days without getting soggy or stale.
- Refrigerator: If your kitchen is warm or humid, refrigerate the loaf wrapped in parchment and foil for up to 5 days. Toasting slices restores that soft interior.
- Freezer: Slice your bread, then wrap each piece individually in parchment paper. Place all wrapped slices in a zip top freezer bag and freeze for up to 1 month. Just pop slices in the toaster when ready to eat.